Using Helmod
These tips were written targeting a 1.1 Space Exploration playthrough; while the recipes are not the same as in Space Age, the usage instructions are still valuable.
Helmod is a mod that calculates the machines required to make a given recipe, calculates how many recipes of each type are required to make a given product, and handles the "spreadsheet" aspect of planning a new build.
By default, it is bound to the U key. This conflicts with the Universe View bind in Space Exploration. I recommend rebinding one of the keys.
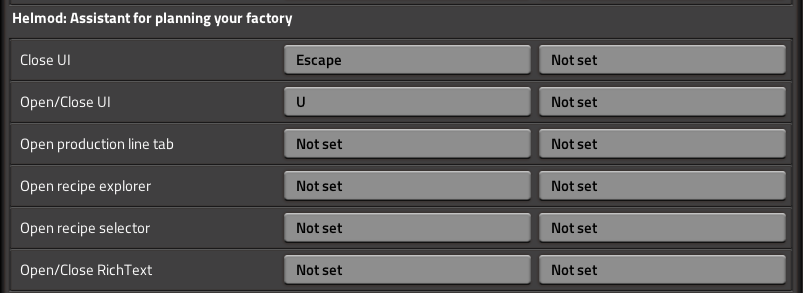
I have Universe Explorer bound to Ctrl + U
Here is the basic interface
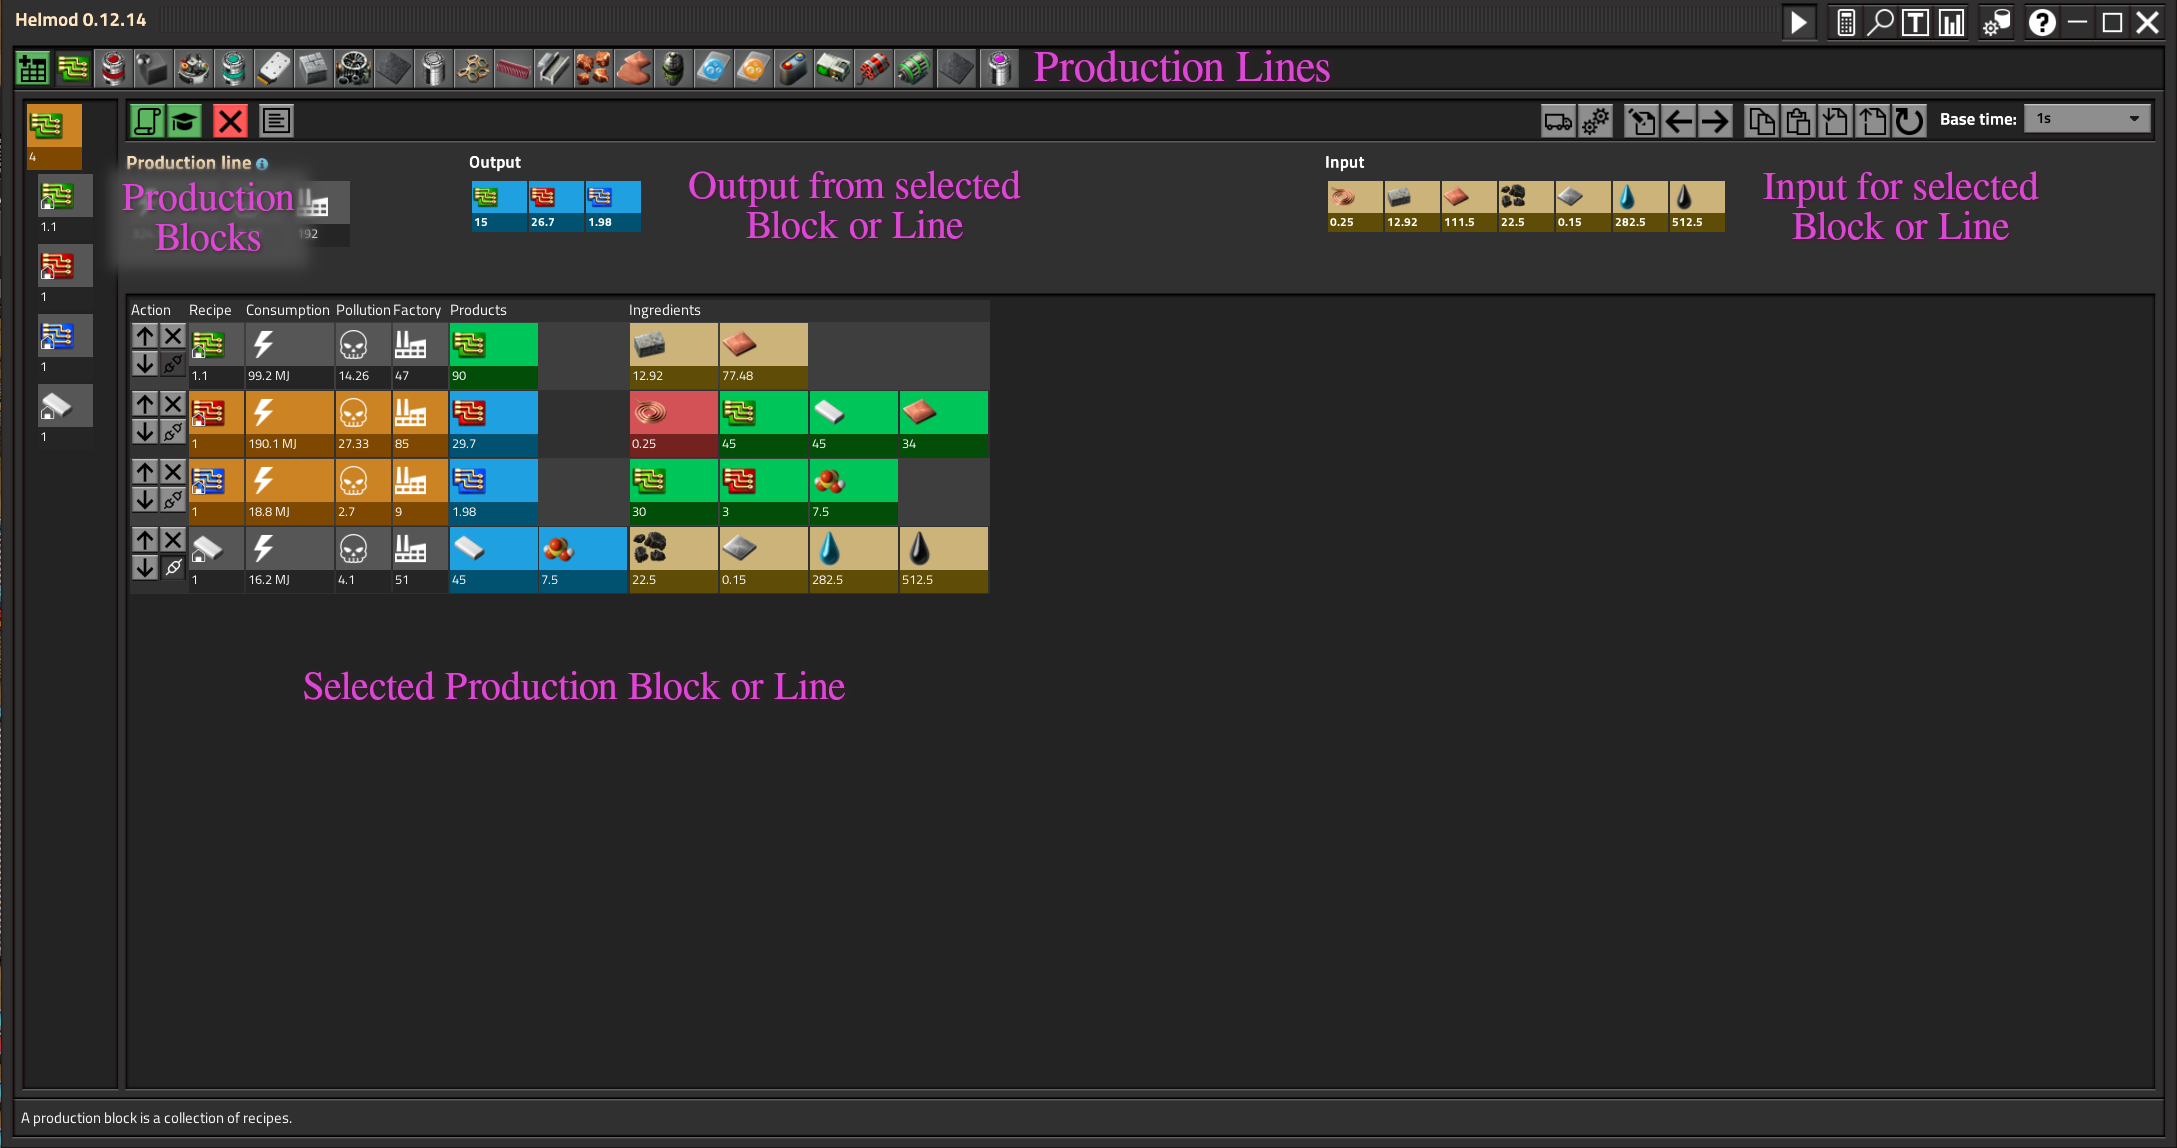
A Production Line is simply a grouping of related Production Blocks. A Production Block is a group of related recipes that are set to met a single goal, such as a certain amount of production capacity of a single item.
Let's do a couple worked examples.
Example 1
We click the green Add Production Line button in the top-left. This creates a new line on the top row. The interface is now blank in the center, since we have no production blocks, and thus no recipes. Let's make some Advanced Circuits. Click on the Add a recipe button, just below the row of Production Lines.

Select the Advanced Circuit recipe. The interface now looks like this:
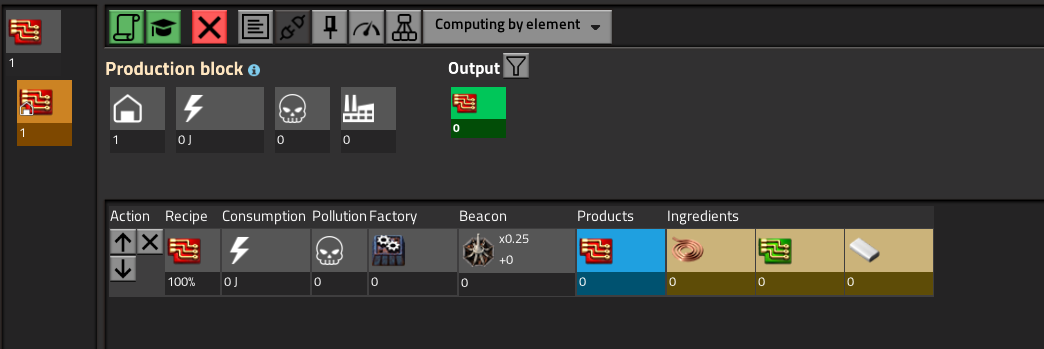
On the left side, the Production Line now has the icon of the Advanced Circuit, and adding a recipe has created a new Production Block, which has now been selected.
What we are seeing right now is the new Production Block. All of the numbers are 0, because the solution has no constraints (no production targets).
Let's set it to 15/s, or one yellow belt. Click on the Advanced Circuit button under the Output label, and then input 15.
We now have numbers:

This is the simplest use of Helmod
However, this is easy enough to do by hand, and we can get a lot more involved.
Handling Intermediates
While a factory might only deal with a single recipe, most will want to make some of their intermediates on site. Which intermediates to make on site and which to make elsewhere is a design decision you have to make (see On-site, off-site).
Let's make Advanced Circuits from "raw" materials: Stone Bricks, Copper Ingots, Plastic.
Click on the Copper Wire, and select the normal recipe to craft it. It will add a row for that recipe, and the input will change to reflect that. Do the same for the Electronic Circuit, and finally, do the same for the Stone Tablet, crafting it from Stone Bricks.

We now see this, but there's a problem. Copper Plates appear in the input, since we're making wire out of them. But Copper Wire also appears in the inputs. Shouldn't we be making that from plates?
Normally, Helmod works from top to bottom, fulfilling ingredients of the recipes above with the products of the current recipe. In this case, we simply need move the Copper Wire recipe down one, so that it takes into account the Electronic Circuit recipe above.
We now know how many Copper Wire, Electronic Circuits, and Plastic each second to produce 15/s Advanced Circuits, and we also know we'll need 120 Assembling Machine 2s.
We now see we need to be able to handle 75 Copper Plates, 30 Plastic, and 7.5 Stone Bricks each second to fulfil our production goal.
We also see how many assembling machines we need for each recipe.
Beacons and Modules
Since we're not in the early game, we should upgrade our plan to use Beacons and Modules.
Click on an assembling machine in the Factory column, then, under the Factory section, select the Assembling machine 3, then click on the "Apply to the whole block" button to change all of the machines in the Production Block.

Then, Ctrl-Click on the Productivity module 3 button to the right, and click on its "Apply to whole block" button. Under the Beacon section, Ctrl-Click on the Speed module 3 button, and apply that to the whole block.
We have reduced our raw requirements by roughly 40%.
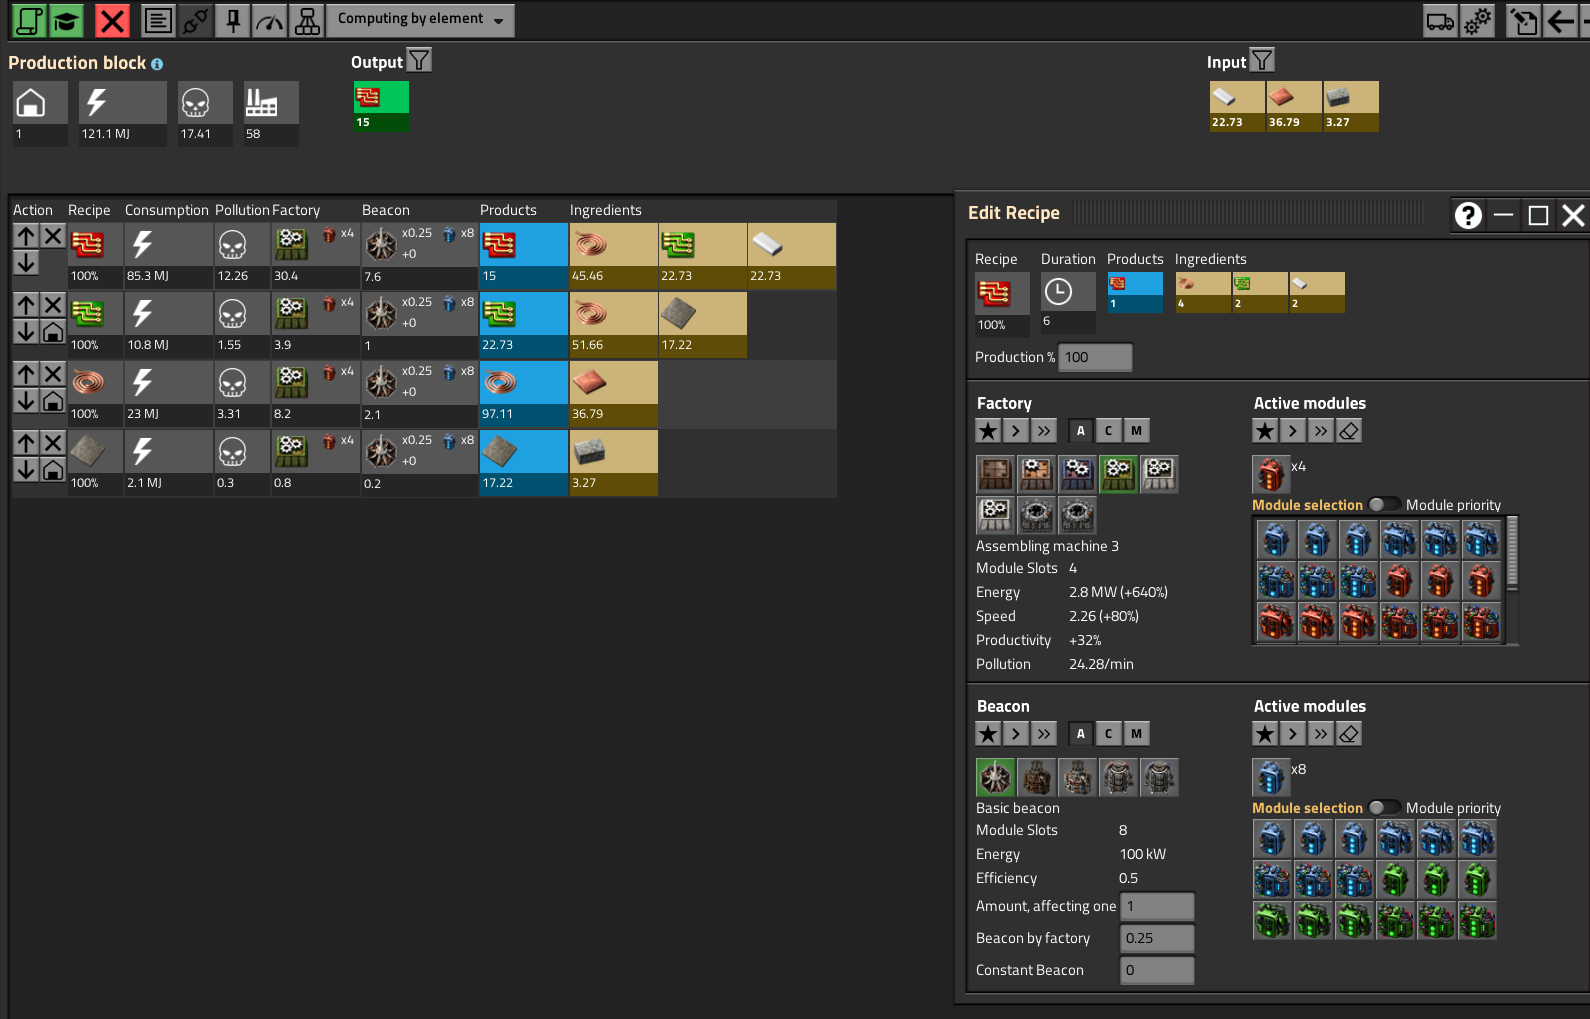
We also need far fewer machines, making the build more compact.
Multiple Products
This factory plan produces 15 Advanced Circuits/s from raw materials. It only produces enough Electronic Circuits to satisfy the peak demand of Advanced Circuits.
While we may use the excess production capacity of Electronic Circuits when they aren't being entirely consumed, we may want to guarantee we have some more capacity to produce Electronic Circuits, so this factory may produce both types at all times.
To do this, we have to set a separate target for Electronic Circuits, and to do that, they must be moved to their own Production Block.
Ctrl-Click on the house shaped button under the Electronic Circuit row to move those recipes to their own block:

Now, since we moved the Copper Wire recipe to Electronic Circuit block, we should add it back to the Advanced Circuit block:

You may at this point notice that when you add the recipe, it doesn't have any modules again. In the Preferences, you may set which crafting machines you'd like to use by default, and what modules you want. For non-space recipes, you should be using Production 3s with beacons everywhere you can.
Now, select the Electronic Circuit block on the left:
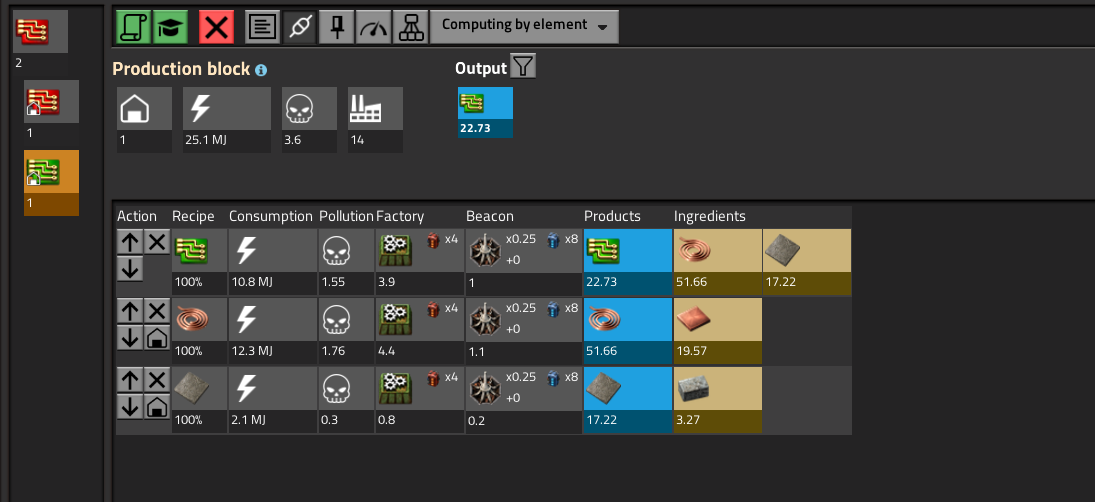
We would like to set a production target, say 45/s Electronic Circuits, but we can't. That is because this is a Linked block, where its output constraints are being set by the input constraints of other blocks, similar to how the constraints of the individual recipe were being set by the above recipes before.
Click on the link button to unlink the recipe, and set the output target to 45.

Now, return to the production line so we can see our combined input/output rates:

Neat!
One last thing: I said earlier we should make this from Copper Ingots, as that's what we ship on the rails and in the rockets.
Since Copper Plates are used by both blocks, and they are cast from ingots in their own area, we should add the recipe as its own block.
Click on the Copper Plate button under the Input section in the top-right, and select the recipe. This will create a new production block.
Final result:

Building a Helmod Plan
Now that we've planned our factory, we have to design it. This part is up to you. But Helmod comes with a key feature that makes this easier.
First, select a Production Block. Then, select the Pin button near the top:

A window summarising the buildings will appear in the left hand side. Now, you may close the main window.
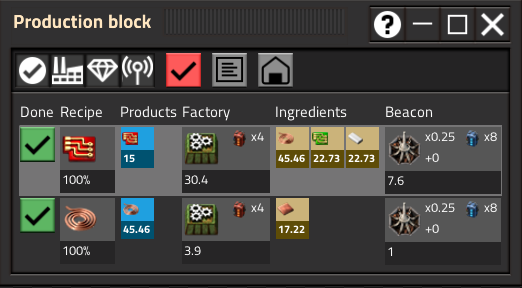
Clicking on a crafting machine in the Factory column will give you a ghost of that factory with its modules and recipe preloaded. Clicking on the Beacon will do likewise.
We can also see the number of factories we have to build total (in this case, I would likely do 4 groups of 8 Advanced Circuit Assembling Machines per beacon, for a total of 32, with one wire machine per group).
Since we can see the amount of ingredients we need for each recipe, we can easily eyeball belt requirements. For example, a yellow belt won't be enough for the copper plates we need, but two, or a red, will.
Sharing your Production Line
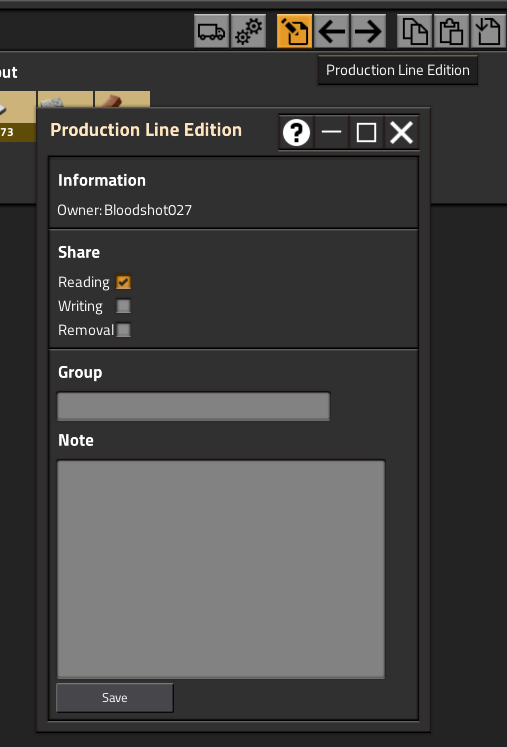
Select the Production Line Edition button, and check off the permissions you'd like others to have.
Mining, Pumping, Power
Mining Drills and Offshore Pumps, from the perspective of the crafting recipe chains, are sources of materials. They produce material "from nothing" (really, just outside of a recipe).
Power, on the other hand, consumes something to produce heat or electricity, but that acts as a sink from the point of view of the recipe chain.
Virtual recipes have been created to simulate these entities, under the Helmod tab:

Converting to Raw Resources
One way to understand the raw resource content of various things is to plot out the entire crafting chain, with whatever modules will be used:
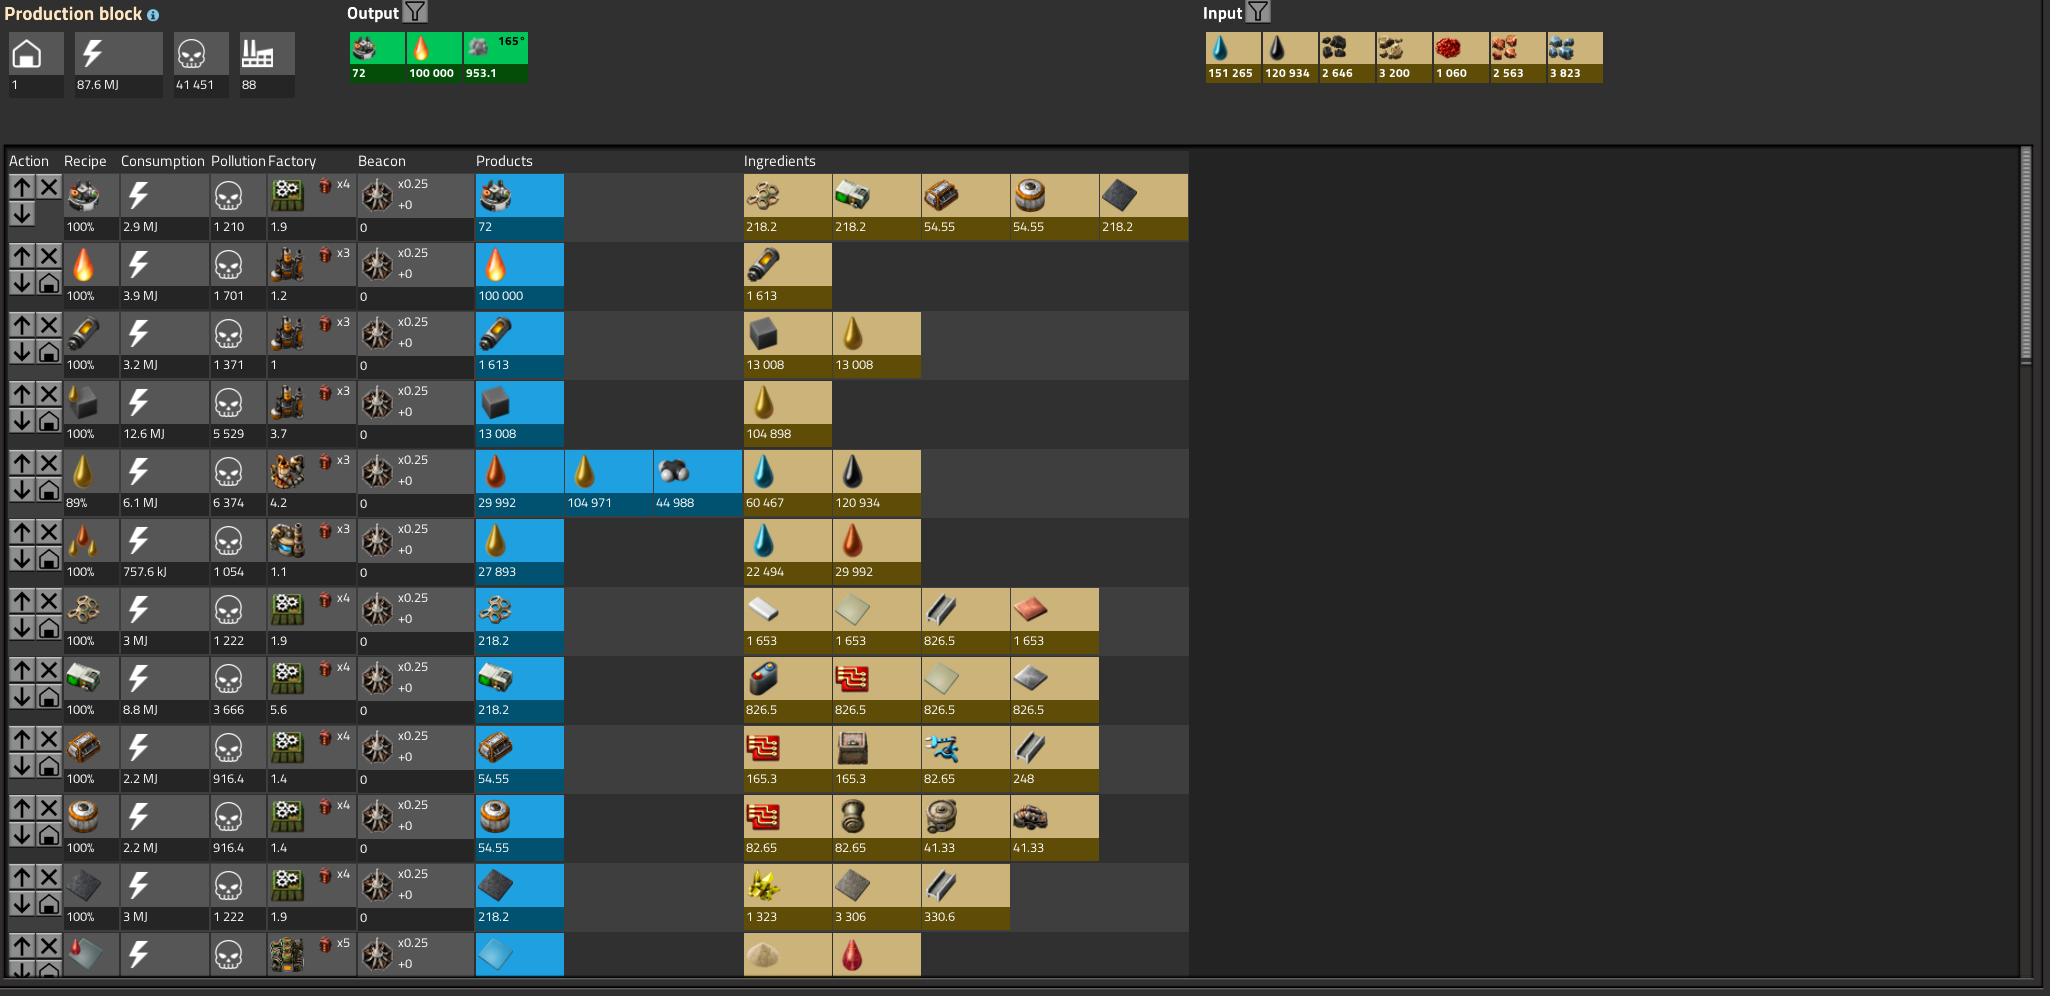
This shows the total costs of a cargo rocket (at current research) in terms of raw resources. The Factory column indicates the number of machines to craft one Cargo Rocket per hour (not per second!)
Because this plan is only being used to estimate costs, it is not broken up into separate production blocks.
Example 2
Our first example was pretty simple. The chain to produce an Advanced Circuit from raw materials is "nice" or "easy" in two ways: it has no loops, and we only used one recipe to produce each ingredient. This is typical of almost all recipes in vanilla Factorio.
However, not all recipes will be this nice. Here, we will learn how to deal with loops, byproducts, and using Helmod to balance recipes that produce the same output.
We will use Production Science Packs as an example.
Create a new Production Line, selecting Production Science Packs as your first recipe for a new block. Then, constrain the output to 1 Production Science Pack/s.
Most ingredients we can make on the ground, and can therefore be taken as inputs into this factory, but some have to be made in space.
Expand those out until you get something that looks like this:

When you get to the Polished Data Storage Substrate recipe, you will have a choice. Choose the one that requires Cosmic Water.
Finally, once you get through all of the ingredients for the ingredients, except for those we make on the ground, your block will look like this:
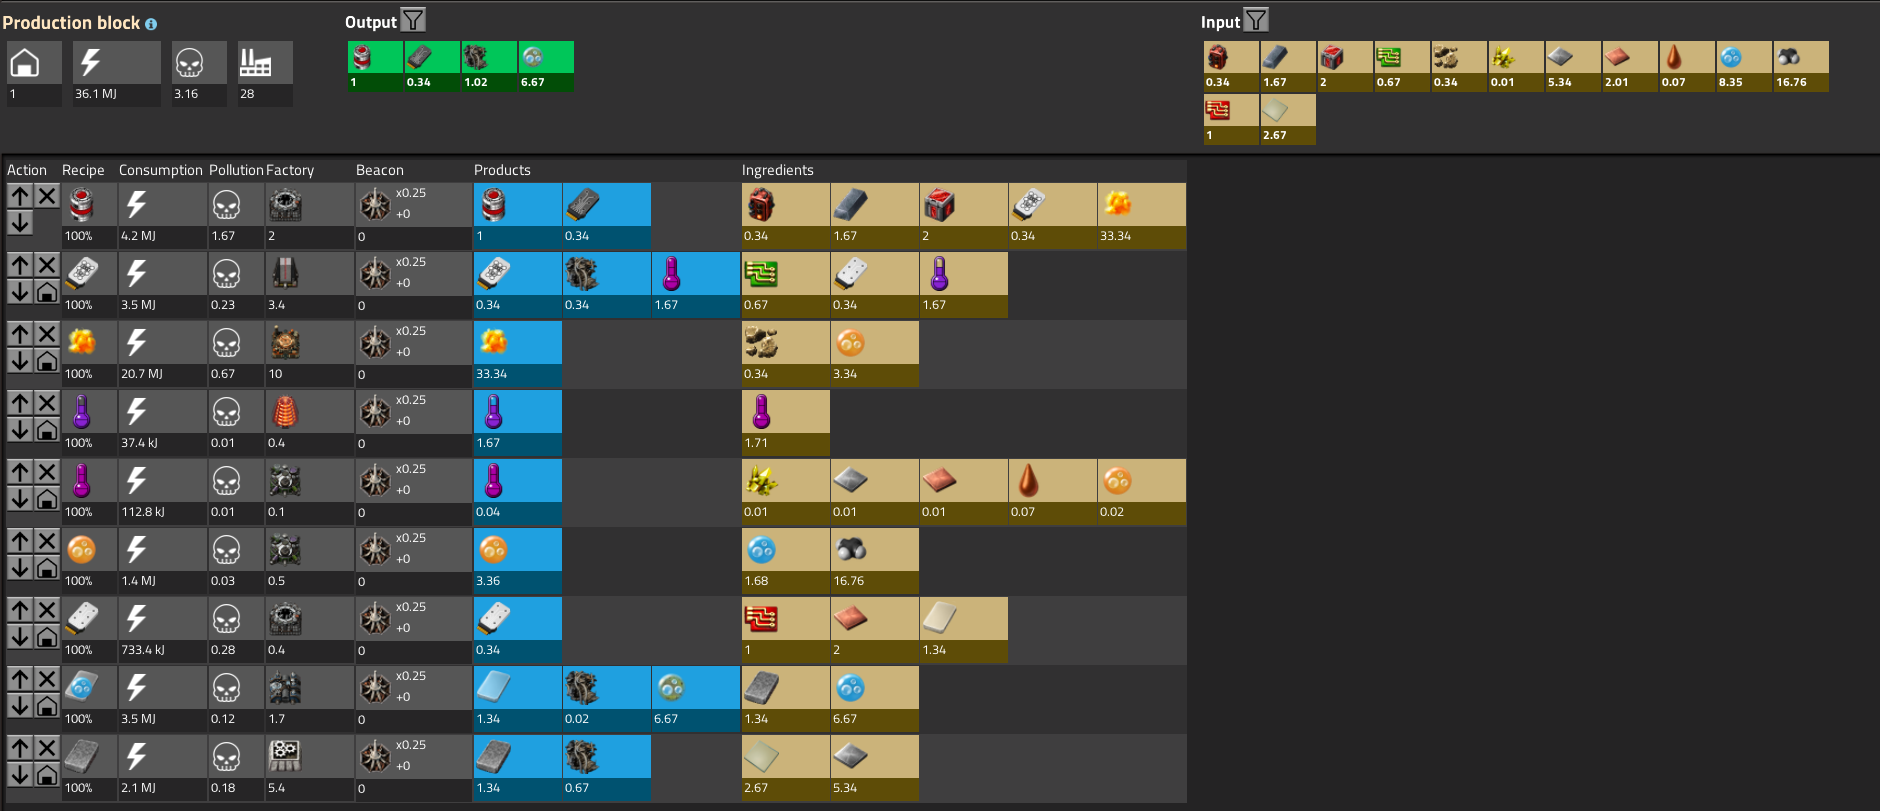
If you've done it in this order, you may notice something. There is a loop here: we require Cool Thermofluid, and produce used up, Warm Thermofluid that we have to cool down in radiators. However, we lose a small amount in the process, and must make up the loss by making more Thermofluid in a Biomechanical Facility.
Without doing any fancy calculations or even noticing it, Helmod has accounted for this loop. In fact, without doing anything unusual, we have almost the entire factory for Production Science.
The one thing we have to do is deal with byproducts. They must go somewhere.
Byproducts, and Ingredient Input
Go back to the Production Line view.
Now, at the top, under the Output section, click on the Junk Data Card, and select the reformatting recipe.
This is different to the other recipes we have selected: rather than finding a recipe that produces this item, we've selected one that consumes it, since it appears in the Ouput section.
Now we have a new Production Block, and it is linked, but all of the numbers are 0. What gives?
Usually, Production Blocks are constrained by their outputs. But, in this case, we want to use up all of the Junk Data Cards that are produced. We want to constrain by input
Select the Ingredient Input button.

Now we should be consuming ⅓ Junk Data Cards/s.
We produce Warm Thermofluid, so click on that under the Products section to cool it back down.
And, as before, we lose a little bit in the process, so let's top it up…

What's happened?
Well this Production Block is constrained by input. That applies to every recipe (that is, every row). But we want this one to produce enough to top us up. In other words, this recipe has to be constrained by its output.
So, in order to do this, we have to move it to its own production block.
This makes sense anyway. The cooling loop is independent of the other blocks, and we can share it between this factory and others, if we build the capacity. Let's remove these rows, and move the ones from the Production Science Pack block into their own Cool Thermofluid block.

Perfect! We have a block that cools all of the Thermofluid for the rest of our blocks.
But, wait. If you've a sharp eye, you might have noticed that now the second recipe produces all of the Thermofluid, rather than just the amount we lose in the loop. But we want to recycle what we can.
The default, top-to-bottom solver is not powerful enough to solve this problem. This production block needs to calculate its rates based on the outputs of other production blocks, balancing the requirements.
Switch to the Matrix Solver for this production block.
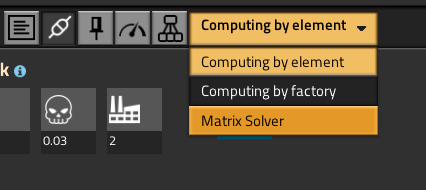
There we go:

We now cool all of the Thermofluid the other blocks produce, and top up on the lost amount within this one, which amounts to 0.05 Warm Thermofluid/s.
In order to make up that lost Thermofluid, we need Chemical Gel, which is also needed by the Production Science Pack. So let's move that to its own block as well.
Return to the Production Science Pack block, and click on the "Convert this recipe to a block" button.

And we can return to our Junk Data Card problem. Remember that?
Reformatting the data cards produces some Broken Data Cards, which will need to be turned into scrap:

Now both this block and the Production Science Pack block produce scrap, so let's deal with that in a separate Production Block that handles scrap from both:

And we should close the loop by turning those ores into plates that can be consumed by the Science Pack:

Now for Biosludge
We get started:

Let's clean the scrap…

…uh…
Again, the default solver is not powerful enough, since there's an internal loop here that produces multiple products.
This problem is more complicated than the earlier Thermofluid loop. It requires balancing out multiple products. Luckily, the Matrix Solver can handle it (note the percentage values on the left).

The scrap will be recycled (make sure to move this Production Block above the Scrap Production Block), and the Cosmic Water will be fed back into the Production Science Pack.
The Biosludge is used for other sciences. For the purpose of this factory, it is Out Of Scope. It may be stored or vented, but we can not turn it into something useful or loop it back in.
(note: at this point I noticed that the solver for this block was causing the solver to have a fit over the Thermofluid block, and vice versa. I solved this by unlinking this block so they wouldn't interfere. I don't know why this happened. They have no ingredients in common)
Almost done now. Returning to the Production Line view (by selecting the top option on the left bar), we see this:
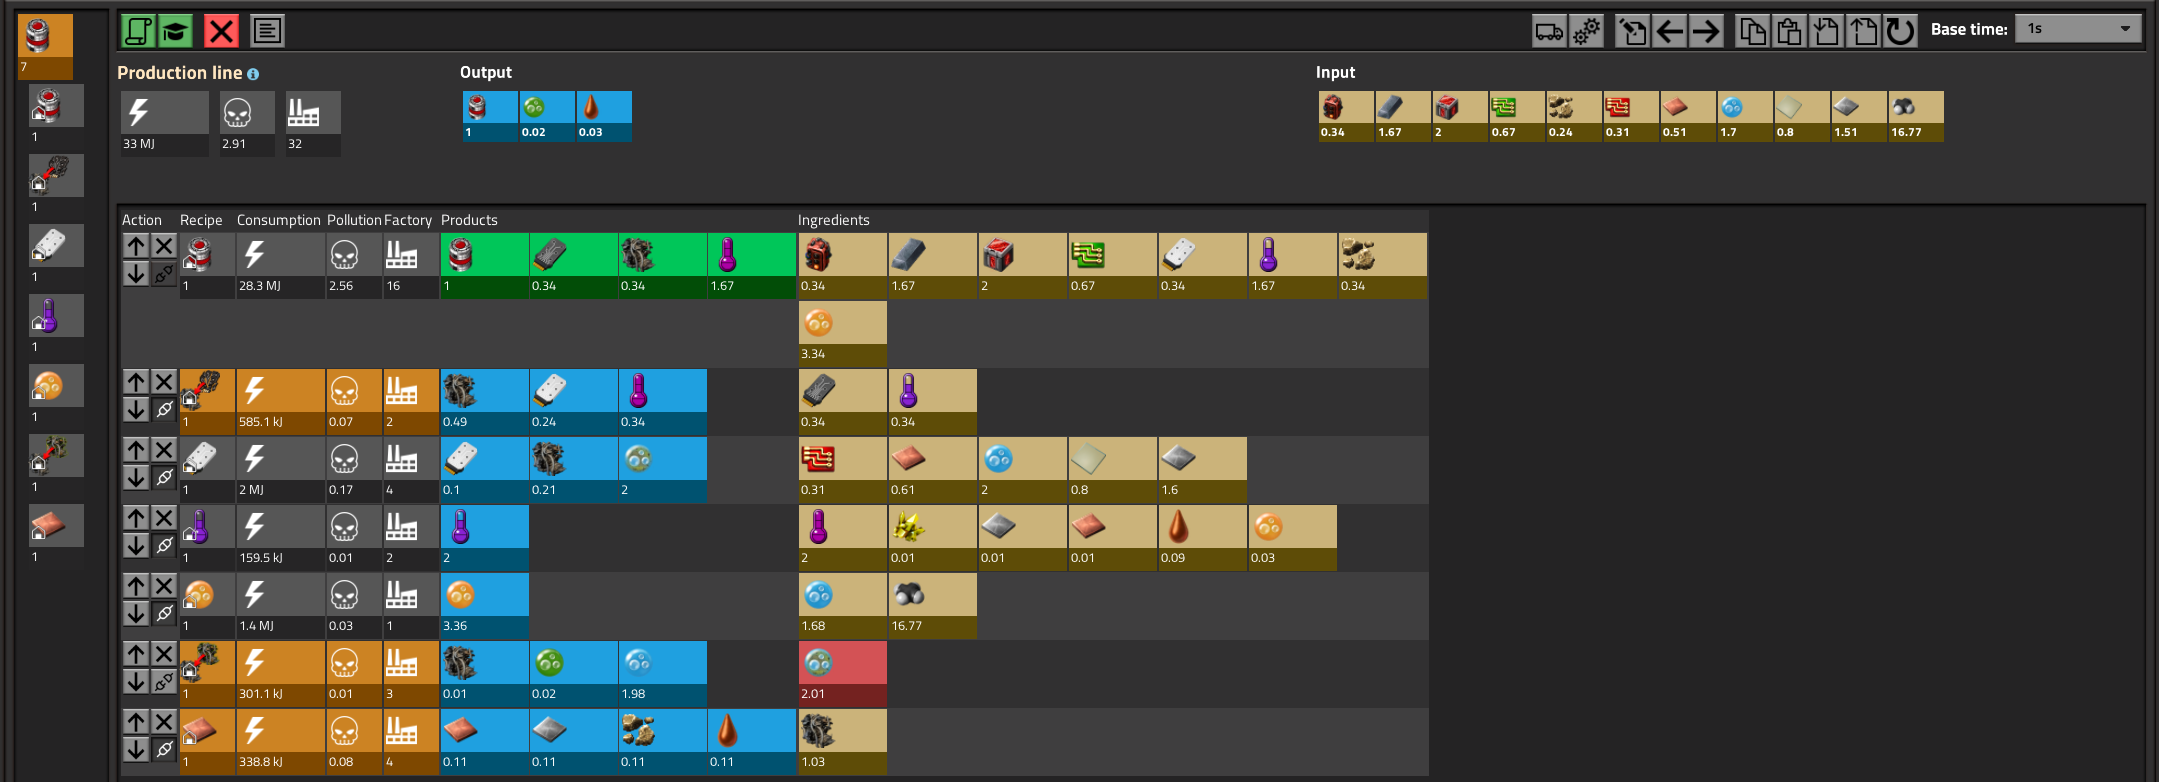
Looking at the Output section, we see that we're producing Biosludge (as we expect), Heavy Oil (which may come as a surprise; this is theoretically positive in Heavy Oil from the scrap, but a crapshoot in practice), and Blank Data Cards. Why are we producing excess cards?
Ah, right, we recycle the cards, but the Production Science Pack block doesn't know about that. The recipe within this block is making all of them that it needs.
Let's move them to their own block, so they both can contribute.

And don- hold on. What are those extra Polished Data Storage Substrates doing in the Output? We don't want to make extra.
The solver is trying to constrain the amount of products we produce based on the needs of other production blocks, as well as this one. When two products are produced, the solver will constrain based on whichever is higher. In this case, the Contaminated Cosmic Water.
We have that Production Block around just to recycle excess, but the solver doesn't know that, and is trying to fill that quota. So we have to tell it that it doesn't need to.
Ctrl-Click on the Polished Data Storage Substrate in the second row to tell the solver that that item is the one we want to constrain on:

Since we're recycling some cards now, we also produce less Contaminated Cosmic Water in total to recycle:

(do you understand why?)
Aside: what happens to that Uranium Ore in the above image? It's made in such low quantities that it just gets rounded to 0 in the solver. It's a floating point error. You should still deal with the output, but a wooden chest would last forever.
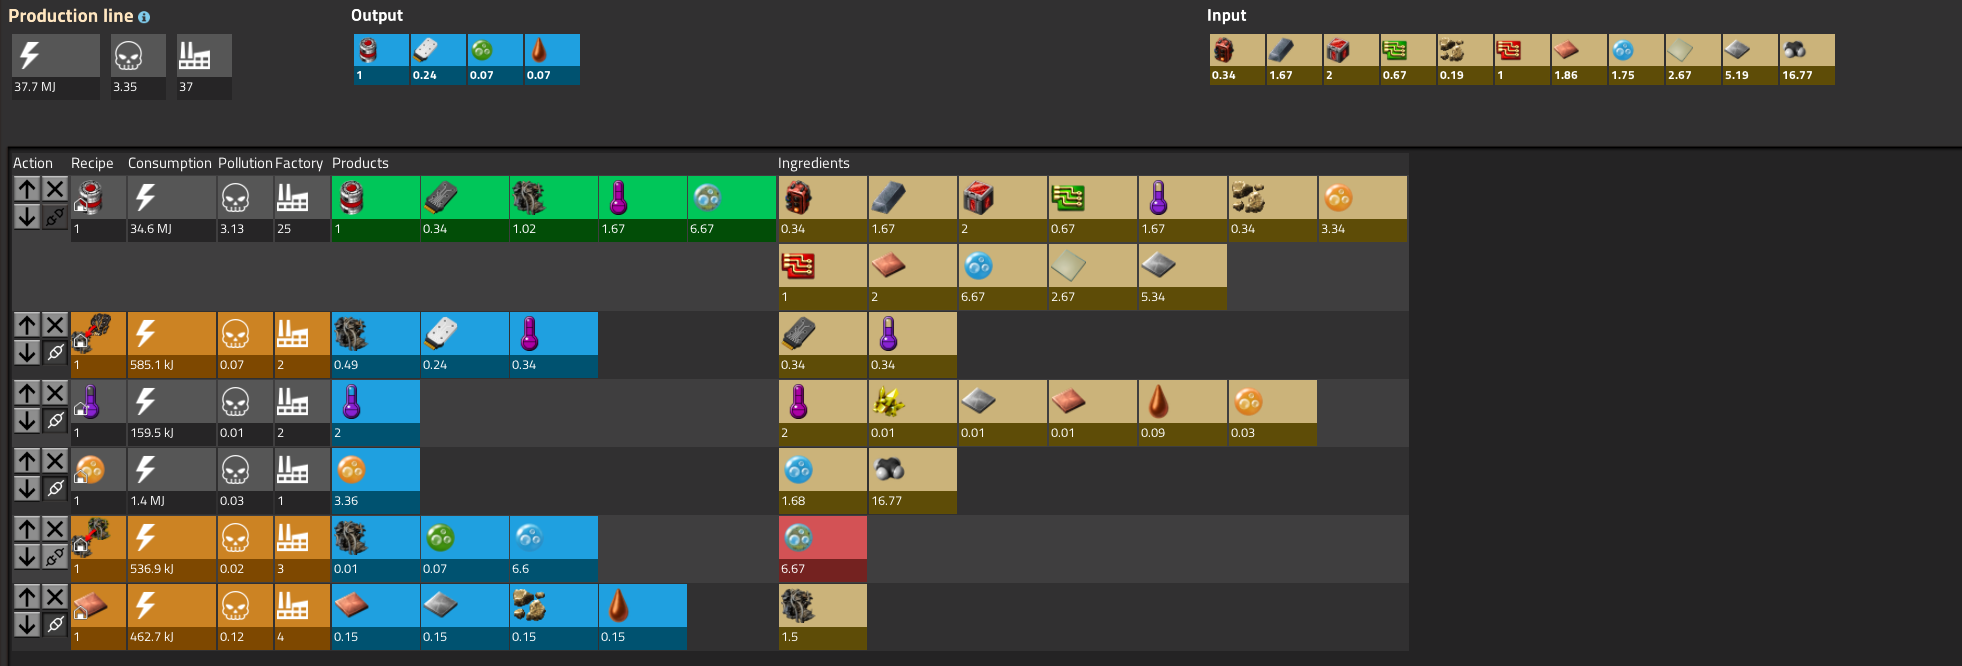
Finally, we are done Having to break things up into separate Production Blocks was annoying at the time, but has resulted in a nice separation of different concerns. Having a common Thermofluid cooling array that can support more than just this science pack would be nice, as well as making Data Cards, Chemical Gel, and handling Scrap. There's nothing that restricts you to building these Production Blocks to only fill the requirements of this one factory. It only tells you the minimum you need to make this amount.
Designing for Loops
While we have planned for the loops in our factory, there are additional concerns for when we actually build them.
Whenever there's a loop that is not exactly neutral (no excess, no topping up) you need to think about priority.
For example, in our Thermofluid loop, we cool all of the Warm Thermofluid we produce, but then need to top that up with a little bit more Warm Thermofluid to compensate for the amount we lose.
If built without consideration, the Biomechanical Facility will produce Thermofluid until the system is clogged, since the Thermofluid that may be reused from elsewhere will have no where to go.
For fluids, the solution is a Circuited Pump attached to a tank. For items, such as the blank data cards, the solution may involve Priority Splitters or Sideloading.
Always prioritise consumption of resources produced within the factory over those injected from outside.
Byproducts
Some recipes produce byproducts, such as our Biosludge. Those byproducts are not used or recyclable within the factory, and are external concerns. Byproducts must be dealt with, since otherwise they will back up production of our desired, primary product.
One way are with voids, which consume the product and produce nothing. For example, Coal may be burned into Steam and then into power, which may be spent on something useless or on the factory doing the work itself.
Fluid Isothermic Generators are an method that can completely delete fluids pumped into them.
For items produced in low quantity that may be useful elsewhere, they may be stored or transported away.
Setting Targets
While we know how to set production targets, what should they be?
The short answer is: whatever you want to build.
The Production Capacity you build is limited by the fixed resources (one time costs) needed to place down the buildings, and by the space you need to build them. They are also limited by logistical constraints to deliver their inputs and receive their outputs.
You can build for any goal, but some heuristics for what that goal should be:
Design for more than you need right now, and more than you have historically needed, unless there is a larger constraint (such as Science per Minute) that can dictate your design capacity.
Try to estimate what space you'd need to build it. Does it look enormous? Does it look puny? It probably is. If it's an intermediate, you can half or double the amount you plan for. Remember, if you need more, you can build another!
Do the inputs look ridiculously high? Then you might not ever use your full capacity, if you can't feed it.
Researching new recipes, buildings, modules will obsolete your designs. If your factory only ever uses a quarter of its capacity before its thrown away, you might be wasting the most valuable resource of all: your time.
Factory Counts and Perfect Ratios
Factorio players sometimes laud the goal of a perfect ratio factory, that is, at peak demand, each crafting machine works 100% of the time. In other words, in such a factory, there is never a need for half an assembler.
Once you start using modules, or just looking a mod recipes, such players may be disturbed to see fractional factory requirements everywhere. Building for perfect ratios, if possible, would require placing down hundreds of machines to reach or approximate an integer solution.
What to do?
The advantage of the perfect ratio factory is this: there is no "excess" power draw from idle machines (this power draw is only a few percent of the power draw of an active machine), and there is no wasted space.
However, these things are only true so long as the factory is always being run at its full capacity: no idle machines. But attempting to reach for perfect, integer solutions usually requires you to build way over your actual needed capacity. And for what? If we want to save on power or space, we have just used up more of it.
So: don't worry about it. Just built at least as much as you need for your target. The fixed costs and constant power draw are negligible for fractions of machines.
If a recipe requires one copper wire machine for every eight circuit machines, it's fine to build one for every four instead, if that fits around the beacons better.
On the distinction between Production and Productive Capacity
You'll see me use the term "Production Capacity" or "Productive Capacity" instead of "Production" consistently. What's the difference?
Production is what you are producing. It's what you get if you hit P in game. Productive Capacity, simply, is the ability to produce something.
Why does that matter?
Consider a hypothetical plan for an Oil Refinery that is able to turn 6000 Crude Oil/s into various oil products. That is, it has the capacity to consume 6000 Crude Oil/s, and produce (let's say) 240 Plastic/s.
If we are concerned with current production, we need to worry about actually feeding all of this Crude Oil, and transporting all of this Plastic somewhere else. If we need to produce (and consume somewhere else) 240 Plastic/s, and some of the machines are stopped, or some of the oil products are backed up, it's cause for concern.
But, instead, if we're only concerned with Production Capacity, then we don't need to worry. The refinery simply has that latent ability, and can sit there idle until its needed. Since everything in Factorio responds linearly, using a fraction of that capacity will result in an equal fraction of the machines working to fulfil it.
When we consider a module (such as this refinery) in isolation, we can consider its capacity in isolation from our actual ability to produce its inputs and consume its outputs.
We can then think about these modules in concert.
This one produces 45 Advanced Circuits, this one needs 15 Advanced Circuits to produce 5 Blank Data Cards, etc.
When considering the Productive Capacity of our entire factory to reach a set target, such as 60 Science per Minute, we can then ensure that we have sufficient capacity in our of our modules, or a sufficient number of them. Or, otherwise, we can simply respond to demand by building additional factories of whatever intermediate when demand exceeds capacity.